 This small oak tree was featured in an earlier posting a little while back. I planted it in my garden back on Cape Breton Island. Two tiny saplings were a gift from a friend who passed away suddenly this past week. When I was very young he and my father would take me on long hikes, deep into the heart of the Island fishing trout from fresh mountain streams. This is not a goodbye, but until we fish again...peace.
Friday, September 12, 2008
Will...
Or Hector, as some may know him...
 This small oak tree was featured in an earlier posting a little while back. I planted it in my garden back on Cape Breton Island. Two tiny saplings were a gift from a friend who passed away suddenly this past week. When I was very young he and my father would take me on long hikes, deep into the heart of the Island fishing trout from fresh mountain streams. This is not a goodbye, but until we fish again...peace.
This small oak tree was featured in an earlier posting a little while back. I planted it in my garden back on Cape Breton Island. Two tiny saplings were a gift from a friend who passed away suddenly this past week. When I was very young he and my father would take me on long hikes, deep into the heart of the Island fishing trout from fresh mountain streams. This is not a goodbye, but until we fish again...peace.
Thursday, September 11, 2008
More on Sharpening
Where two planes collide...
 That says it all doesn't it? Two planes, the front bevel of a blade, and the back; these two surfaces meeting...well, almost meeting. No pressure, right? My previous post showed a couple of tricks while using the Veritas Honing guide on Sandpaper and Glass, this time I'll cover my entire sharpening process. To be honest, since I've moved to my luxurious basement shop I've been using water stones. My last shop out on the Coast wasn't heated so water stones were never an option. I do however still keep my sand paper on glass for honing and dressing my card scrapers. I'll cover that method in the future but for now, let's begin...
Wet Grinding
 To establish the bevel of a cutting tool I use a slow speed wet grinder. Mine is manufactured by Jet and has served me well for the past few years. I like the wet grinder over a dry one for a few reasons. Number one: there's no way in hell you'll ever burn an edge on this machine and two, it has a nice tranquil watery sound when it's running...kind of like a cool mountain brook. (just kidding) The Jet model has a speed control and a torque which I find extremely useful.
  To begin, I'll clamp the iron into the jig/holder which came with the unit. A quick set-up and we're off...I apply moderate pressure here and work the edge back and forth so not to wear one side of the wheel more than the other. A minute or two and I'm done. Take it out of the jig and dry it off. A quick look to see how you've done and we're on to the water stones.
Water Stones
 I use three different grades of water stones; all by Norton. These cut really fast and are a pleasure to use. A 1000 grit, a 1000/4000 combination stone and finally an 8000. I decided to go with the 1000/4000 combination stone because I want to keep my stones dressed before, during and after every use. Before starting I'll take my 1000 stone and dress it with the 1000 side of the combination stone. Then while I'm using it I'll continue to dress it every few minutes.
  This will ensure you're stones stay flat; the most important point when dealing with water stones. I like to check the bevel to confirm I'll be setting up my honing guide properly. In this case I'm sharpening my Iron from my jointing plane which has a 35 degree bevel. This is a high angle that takes care of difficult grain and leaves very little if any tear out. The whole stone dressing thing is something I picked up from Rob Cosman, he has a great sharpening video out that's worth watching. One aspect where I differ from Rob is he free hands when sharpening and I'll use a honing guide. I've sharpened without the guide but feel that sometimes I'd get small discrepancies in my bevel...the honing guide is reliable, easy to use and doesn't take much more time to set up and use. If you can reliably sharpen by hand and achieve favourable results every time, than do it. If you're like me though and may wander off a little while trying to establish a main bevel, secondary bevel and finally a micro-bevel on your edge, then use a guide. David Charlesworth address this point on using honing guides quite well in one of his books...I believe it's volume two.?
Honing Guide set-up
 The Veritas® Mk.II Honing Guide is a great jig for repeated, reliable sharpening. First time users may have a slight learning curve with it's set up but once or twice and it'll be second nature. Once I've determined my bevel angle I'll take the registration jig that comes with the tool and set it for this 35 degree, high angle bevel. One other nice thing about this jig is you can do high angles, standard angles as well as back-bevels with a simple adjustment. So now we have the desired angle we can slide the registration jig onto the main body of the guide and lightly tighten it. When doing this part there's small registration lines so you can set it to the desired width depending on what size blade your sharpening. In this case it's just over 2".
  Next, flip the jig over and slide your plane iron in. The registration guide makes it error proof to square up the iron and establish the proper length protruding from the guide. Tighten up the blade clamp knobs and we're ready to go. One other point to mention is before you start, double check the micro-bevel knob; make sure when starting on your 1000 grit stone it's in the 12:00 position. Then after each stone grit you'll go from 12 to 3 to finally 6:00 finishing on the 8000 stone. This is what establishes the standard bevel, a secondary bevel and finally the third micro-bevel which at that point will cut the hair off of your arm! Let's begin...
 I splash a bit more water on the stone after I've dressed it before beginning. Apply moderate, consistent pressure and gently move back and forth over the 1000 grit stone. Be careful when you first touch the Iron to the stone you don't dig into it. I always like to begin by placing the edge of the Iron at the top, furthest point of the stone and gently draw the guide back towards my body. Then on the first couple of push strokes I'm careful not to rock the jig. A few passes and you'll start to feel the primary bevel becoming established. The water will actually start to grab the tiny edge and suck it into the stones surface. A minute or two at most and I'll grab my combination stone and re-dress the surface using the 1000 grit side. Rotate the stones frequently while you work checking the bevel often. Another minute or two and we're done. Again before putting the 1000 grit stone back into a water bath, dress it quickly with the combination stone.
  Next I'll insert the combination stone, 4000 grit side now, and adjust the micro-bevel knob to the 3:00 position. Now we're gently working on this secondary bevel. A minute and we're done. Again, dress the stones and move on to the 8000 grit. This final stone is quite soft and should be used with great care. The same procedure applies but I try to take some extra precautions while using it. Before I start I'll again reset the micro bevel knob to it's final position at 6:00.
  This creates a tiny micro-bevel that when properly done will scare you; this is really sharp! Another minute or two is all that's needed to establish this final bevel; when complete, carefully remove the Iron from the jig and dress the stone again. Another small splash of water and we can hone the back surface of the blade.
Moderate pressure and even strokes up and down the stone will insure desirable results. I constantly flip the stone end for end and redress often. Flattening the back of a new blade may take up to 10 minutes like this. Keep re-applying water, turning the stone over to wear both sides and try to use the entire surface of the water stones. The Iron I'm working on today has already been properly flattened and only requires a few seconds to cut-away the tiny burr left behind from the previous steps. When I can see my ugly mug in the reflection, I'm done! Time to put it to work. Carefully dry the Iron and insert it back into the body of the plane being sure not to catch the edge on the way. This final picture shows some shavings from a piece of Walnut. These are end grain shavings!
  This is really sharp and the entire process I've just described took no more than 4 to 6 minutes at best.
Cheers!
 That says it all doesn't it? Two planes, the front bevel of a blade, and the back; these two surfaces meeting...well, almost meeting. No pressure, right? My previous post showed a couple of tricks while using the Veritas Honing guide on Sandpaper and Glass, this time I'll cover my entire sharpening process. To be honest, since I've moved to my luxurious basement shop I've been using water stones. My last shop out on the Coast wasn't heated so water stones were never an option. I do however still keep my sand paper on glass for honing and dressing my card scrapers. I'll cover that method in the future but for now, let's begin...
Wet Grinding
 To establish the bevel of a cutting tool I use a slow speed wet grinder. Mine is manufactured by Jet and has served me well for the past few years. I like the wet grinder over a dry one for a few reasons. Number one: there's no way in hell you'll ever burn an edge on this machine and two, it has a nice tranquil watery sound when it's running...kind of like a cool mountain brook. (just kidding) The Jet model has a speed control and a torque which I find extremely useful.
  To begin, I'll clamp the iron into the jig/holder which came with the unit. A quick set-up and we're off...I apply moderate pressure here and work the edge back and forth so not to wear one side of the wheel more than the other. A minute or two and I'm done. Take it out of the jig and dry it off. A quick look to see how you've done and we're on to the water stones.
Water Stones
 I use three different grades of water stones; all by Norton. These cut really fast and are a pleasure to use. A 1000 grit, a 1000/4000 combination stone and finally an 8000. I decided to go with the 1000/4000 combination stone because I want to keep my stones dressed before, during and after every use. Before starting I'll take my 1000 stone and dress it with the 1000 side of the combination stone. Then while I'm using it I'll continue to dress it every few minutes.
  This will ensure you're stones stay flat; the most important point when dealing with water stones. I like to check the bevel to confirm I'll be setting up my honing guide properly. In this case I'm sharpening my Iron from my jointing plane which has a 35 degree bevel. This is a high angle that takes care of difficult grain and leaves very little if any tear out. The whole stone dressing thing is something I picked up from Rob Cosman, he has a great sharpening video out that's worth watching. One aspect where I differ from Rob is he free hands when sharpening and I'll use a honing guide. I've sharpened without the guide but feel that sometimes I'd get small discrepancies in my bevel...the honing guide is reliable, easy to use and doesn't take much more time to set up and use. If you can reliably sharpen by hand and achieve favourable results every time, than do it. If you're like me though and may wander off a little while trying to establish a main bevel, secondary bevel and finally a micro-bevel on your edge, then use a guide. David Charlesworth address this point on using honing guides quite well in one of his books...I believe it's volume two.?
 Honing Guide set-up
 The Veritas® Mk.II Honing Guide is a great jig for repeated, reliable sharpening. First time users may have a slight learning curve with it's set up but once or twice and it'll be second nature. Once I've determined my bevel angle I'll take the registration jig that comes with the tool and set it for this 35 degree, high angle bevel. One other nice thing about this jig is you can do high angles, standard angles as well as back-bevels with a simple adjustment. So now we have the desired angle we can slide the registration jig onto the main body of the guide and lightly tighten it. When doing this part there's small registration lines so you can set it to the desired width depending on what size blade your sharpening. In this case it's just over 2".
  Next, flip the jig over and slide your plane iron in. The registration guide makes it error proof to square up the iron and establish the proper length protruding from the guide. Tighten up the blade clamp knobs and we're ready to go. One other point to mention is before you start, double check the micro-bevel knob; make sure when starting on your 1000 grit stone it's in the 12:00 position. Then after each stone grit you'll go from 12 to 3 to finally 6:00 finishing on the 8000 stone. This is what establishes the standard bevel, a secondary bevel and finally the third micro-bevel which at that point will cut the hair off of your arm! Let's begin...
 I splash a bit more water on the stone after I've dressed it before beginning. Apply moderate, consistent pressure and gently move back and forth over the 1000 grit stone. Be careful when you first touch the Iron to the stone you don't dig into it. I always like to begin by placing the edge of the Iron at the top, furthest point of the stone and gently draw the guide back towards my body. Then on the first couple of push strokes I'm careful not to rock the jig. A few passes and you'll start to feel the primary bevel becoming established. The water will actually start to grab the tiny edge and suck it into the stones surface. A minute or two at most and I'll grab my combination stone and re-dress the surface using the 1000 grit side. Rotate the stones frequently while you work checking the bevel often. Another minute or two and we're done. Again before putting the 1000 grit stone back into a water bath, dress it quickly with the combination stone.
  Next I'll insert the combination stone, 4000 grit side now, and adjust the micro-bevel knob to the 3:00 position. Now we're gently working on this secondary bevel. A minute and we're done. Again, dress the stones and move on to the 8000 grit. This final stone is quite soft and should be used with great care. The same procedure applies but I try to take some extra precautions while using it. Before I start I'll again reset the micro bevel knob to it's final position at 6:00.
  This creates a tiny micro-bevel that when properly done will scare you; this is really sharp! Another minute or two is all that's needed to establish this final bevel; when complete, carefully remove the Iron from the jig and dress the stone again. Another small splash of water and we can hone the back surface of the blade.
Moderate pressure and even strokes up and down the stone will insure desirable results. I constantly flip the stone end for end and redress often. Flattening the back of a new blade may take up to 10 minutes like this. Keep re-applying water, turning the stone over to wear both sides and try to use the entire surface of the water stones.
 The Iron I'm working on today has already been properly flattened and only requires a few seconds to cut-away the tiny burr left behind from the previous steps. When I can see my ugly mug in the reflection, I'm done! Time to put it to work. Carefully dry the Iron and insert it back into the body of the plane being sure not to catch the edge on the way. This final picture shows some shavings from a piece of Walnut. These are end grain shavings!
  This is really sharp and the entire process I've just described took no more than 4 to 6 minutes at best.
Cheers!
Tuesday, September 2, 2008
Tool Tip
Veritas® Mk.II Honing Guide
 If you use a sandpaper on glass sharpening method you're well aware of the process involved in maintaining the sandpaper. From often changes to tiny tears due to ripples created when tiny pockets of air get trapped underneath the paper. I've discovered a few tricks to help eliminate these 'bubbles' between the paper and glass and generally highten the odds of achieveing great sharpening results.
The first step when applying the paper to the glass is being sure the glass is completely clean and free of any small dust particles. I generally rub a small amount of mineral spirits over the glass with a clean shop towel, this not only gets rid of small amounts of dirt and grit it penetrates any of the sticky residue left behind from the previous adhesive backed paper. Once you have the glass clean, cut your paper to size and apply a small drop of water with a little dish detergent in it. Just a drop is all that's needed to allow the paper to move around ever so slightly while applying. Peel off the paper backing and apply. The best way to get rid of the air bubbles from underneath is with a burnishing tool of some kind; this is where your honing jig comes in handy. What better way to get rid of these little pockets than to use the heavy brass roller that comes standard on the Veritas® Mk.II Honing Guide. Just tip it back a little so the front lip is clear and, while pressing down firmly push any air out from each edge of the sandpaper.
 Oncet the paper is applied, it's time to sharpen. I always like to add some oil to the paper, this will quickly work itself into a slurry when you start to wear off metal from your iron. Clear machine oil is available or you can try using household baby oil available in every drug store around. To reach favourable results I find a good amount of downwards force is required on the blades leading edge. To achieve this and maintain stability, I will often turn the honing guide around and draw it towards me, not unlike the motion of using a Japanese hand plane. This will allow you to use your thumbs for added downwards pressure and gives you a lot more control over applied sections of the Irons edge. IE: honing a slight camber into the outside edges of a smoothing plane. The Mk.II is a sure fire way to get favourable repeated results when sharpening and these couple of tricks can get you closer to that perfect edge.
Remember, it can never be too sharp!
 If you use a sandpaper on glass sharpening method you're well aware of the process involved in maintaining the sandpaper. From often changes to tiny tears due to ripples created when tiny pockets of air get trapped underneath the paper. I've discovered a few tricks to help eliminate these 'bubbles' between the paper and glass and generally highten the odds of achieveing great sharpening results.
The first step when applying the paper to the glass is being sure the glass is completely clean and free of any small dust particles. I generally rub a small amount of mineral spirits over the glass with a clean shop towel, this not only gets rid of small amounts of dirt and grit it penetrates any of the sticky residue left behind from the previous adhesive backed paper. Once you have the glass clean, cut your paper to size and apply a small drop of water with a little dish detergent in it. Just a drop is all that's needed to allow the paper to move around ever so slightly while applying. Peel off the paper backing and apply. The best way to get rid of the air bubbles from underneath is with a burnishing tool of some kind; this is where your honing jig comes in handy. What better way to get rid of these little pockets than to use the heavy brass roller that comes standard on the Veritas® Mk.II Honing Guide. Just tip it back a little so the front lip is clear and, while pressing down firmly push any air out from each edge of the sandpaper.
 Oncet the paper is applied, it's time to sharpen. I always like to add some oil to the paper, this will quickly work itself into a slurry when you start to wear off metal from your iron. Clear machine oil is available or you can try using household baby oil available in every drug store around. To reach favourable results I find a good amount of downwards force is required on the blades leading edge. To achieve this and maintain stability, I will often turn the honing guide around and draw it towards me, not unlike the motion of using a Japanese hand plane. This will allow you to use your thumbs for added downwards pressure and gives you a lot more control over applied sections of the Irons edge. IE: honing a slight camber into the outside edges of a smoothing plane. The Mk.II is a sure fire way to get favourable repeated results when sharpening and these couple of tricks can get you closer to that perfect edge.
Remember, it can never be too sharp!
Tuesday, August 19, 2008
Watch this
From the ashes of industry rises the machine...
An intricate hand-cranked machine made entirely of wood and glue (no metal or other materials). He has made several other wooden machines, but calls this latest one his crowning achievement. Del is 71 years old. Incredible.
An intricate hand-cranked machine made entirely of wood and glue (no metal or other materials). He has made several other wooden machines, but calls this latest one his crowning achievement. Del is 71 years old. Incredible.
Friday, August 15, 2008
The good, the bad and the...
New Hand Saws
 I ordered a couple of new hand saws a few weeks ago from Tools for Working Wood, a great company with a nice web site. I've ordered a few items in the past and have never had an issue, professional across the board. Since relocating here in Toronto, I've been using only hand tools for my work. Great. No worries, until I needed to cut a curve in the base of a small set of night stands I was working on. Oh-how I longed for my band saw, back in my old shop on the coast. It would certainly make quick work of this small project...So what did I do? I ordered the Gramercy Tools 12" Bow Saw; a sweet little saw, made in the USA. "Ah, just the thought of it brings a tear to my glass eye..."
So while I'm at it I decided I also needed another Rip saw. Seeing as my two old antiques are just that, old antiques, I felt it to be a just purchase. ( I'm actually on the waiting list at Wenzloff & Sons for a custom Cross-Cut and Rip saw; I think they'll be ready sometime in the year 2053 but that's a whole other story. )
So in my despair to get a new rip saw I ordered the 28" Pax saw from TFWW. So two saws arrived and I tear into them. If you read my earlier blog on making new tool handles you'll know that I don't particularly care for the Pax saw handles. I find them large for my hand and to be frank, rather unattractive. So I take out the Rip saw and put it aside to get into the Bow saw. A nice little box within it a well made hand tool, nicely wrapped up in green tissue it was like someone had given me a Christmas present. All it needed was a cute little bow on top. So here I am admiring my new saws and decide the first thing in order, to make a new handle for the Pax...and what better tool to use to cut out the shape? Yup, the bow saw.
Cutting out the Shape
 So to make a new handle I selected my wood, walnut in this case, and traced the handle from my old Disston. I did a quick read through the instruction booklet that came with the bow saw and after tightening the tension on the blade (which was loosened for shipping) I went at it. What happened next in my mind was really incredible; this fine little saw cut so fast, clean and effortless I wondered why it took me so long to ever get one. Beautifully balanced, no chatter or binding, just gentle strokes through the 4/4 walnut. The entire saw handle took no more than 10 minutes at most. So now here I am, a familiar place where I know the process. I took out my brace and 1" auger bit to complete the curves of the handle. No problems so far. Some filing and shaping, a little sanding and carving, voila! Done except to cut the kerf and drill the screw holes...so again, I turn my attention to the Pax. At this stage I think back when I was making a new handle for my Pax cross cut saw.I simple took the handle, not at all unlike this one, and unscrewed the Pax handle, removed it, lined up the two and with my awl, marked the screw holes...easy right?
Oh Pax...what have you done?
 So just to recap and get things clear in my own mind, I'm standing there with my newly made walnut handle, I take hold of my screwdriver and gently start to back out the brass screws. At this point I notice the Medallion on the side of the Pax handle is sitting proud...no big deal I thought, must be something underneath...I'll clean it up when I remove the handle. So first screw, second screw; down through to five all of the screws come out. I squeeze the blade of the saw into my shoulder vise and make my first attempt to remove the handle. No luck..? I get a little more aggressive and try the whole wiggle-waggle-back-and forth approach...still nothing, not even a squeak. I place a wood block on the heel of the blade and gently at first try tapping to loosen the handle. O.k. at this point I'm starting to realise something is not right. Did they glue it on? No, couldn't be. That would be just plain ignorant. Some more prying, some hitting and then on to some down home whacking! Come on, this should come off...what if I just wanted to do a quick tune up, cleaning or sharpening? Saw handles are meant to be relatively easy to remove, no?
Then it happens, you know the blinding white light, ears start ringing, sweaty palms...I grab the biggest, meanest, ugliest chisel my tool box had to offer and split this thing open like a fresh brook trout in August. I didn't like it in the first place, but admittedly didn't want to destroy it either. So there I am, cracking and splintering the shiny new handle off of my nice new Pax rip saw...
(that's Pax right? I did mention it was a Pax right?)
 So like Indiana Jones discovering artifacts under the sands I see the problem. It seems this saw, during manufacturing must have assembled the wooden handle onto the blade and then drilled through the whole lot with a dull bit. The metal burned and charred through creating a kind of sleeve that mated into the opposite side of the wood.!@$%^&*(!!!"":{
If you look closely at the pics you can see what I mean...bad, shotty workman ship....that's just the way it is. Now I have to get out some files and flatten out the dimples of burnt metal left behind to irritate me to no end. (At least this was how I felt at the time.)
All calm and clean now, me and the saw that is, ready to trace the screw holes onto my new handle, drill them out and install the screws. No worries, at least the metal is un-damaged and seems to be well sharpened and straight. I breeze through these steps and give the handle a quick coat of oil. I didn't spend too much time on the sanding this time due to the fact that I have work to do! Boards to rip and kids to feed...so perhaps a little rough I'll get to it sometime in the future when I don't have four orders to finish. So here I go, putting things together, first screw, second screw...then I get to the medallion; I had forgotten about the way it had been sitting on the original handle. hmmmm.....crooked as a cats...again, the light starts to come back....I'm having an incredible hulk moment and want to throw the whole thing into a dumpster somewhere. How could this happen? The shiny little medallion, like a signature, carefully placed into the finished saw to say
" made with pride by..." I just don't get it at all. What happened in the two years between saws? My cross cut I purchased from Lee Valley Tools seemed like a nicely made hand tool, other than the handle simply didn't suit my hand...two years later, this poorly made piece of...I digress. I put the handle on and went to work.
It cuts pretty good and my new handle is comfortable. I left the crooked medallion sitting proud of the side to remind me to call Mike Wenzloff again...You really do get what you pay for.
PS.
Hey Schwarz, I guess you're having an 'I told you so' moment right now...Cheers!
 I ordered a couple of new hand saws a few weeks ago from Tools for Working Wood, a great company with a nice web site. I've ordered a few items in the past and have never had an issue, professional across the board. Since relocating here in Toronto, I've been using only hand tools for my work. Great. No worries, until I needed to cut a curve in the base of a small set of night stands I was working on. Oh-how I longed for my band saw, back in my old shop on the coast. It would certainly make quick work of this small project...So what did I do? I ordered the Gramercy Tools 12" Bow Saw; a sweet little saw, made in the USA. "Ah, just the thought of it brings a tear to my glass eye..."
So while I'm at it I decided I also needed another Rip saw. Seeing as my two old antiques are just that, old antiques, I felt it to be a just purchase. ( I'm actually on the waiting list at Wenzloff & Sons for a custom Cross-Cut and Rip saw; I think they'll be ready sometime in the year 2053 but that's a whole other story. )
So in my despair to get a new rip saw I ordered the 28" Pax saw from TFWW. So two saws arrived and I tear into them. If you read my earlier blog on making new tool handles you'll know that I don't particularly care for the Pax saw handles. I find them large for my hand and to be frank, rather unattractive. So I take out the Rip saw and put it aside to get into the Bow saw. A nice little box within it a well made hand tool, nicely wrapped up in green tissue it was like someone had given me a Christmas present. All it needed was a cute little bow on top. So here I am admiring my new saws and decide the first thing in order, to make a new handle for the Pax...and what better tool to use to cut out the shape? Yup, the bow saw.
Cutting out the Shape
 So to make a new handle I selected my wood, walnut in this case, and traced the handle from my old Disston. I did a quick read through the instruction booklet that came with the bow saw and after tightening the tension on the blade (which was loosened for shipping) I went at it. What happened next in my mind was really incredible; this fine little saw cut so fast, clean and effortless I wondered why it took me so long to ever get one. Beautifully balanced, no chatter or binding, just gentle strokes through the 4/4 walnut. The entire saw handle took no more than 10 minutes at most. So now here I am, a familiar place where I know the process. I took out my brace and 1" auger bit to complete the curves of the handle. No problems so far. Some filing and shaping, a little sanding and carving, voila! Done except to cut the kerf and drill the screw holes...so again, I turn my attention to the Pax. At this stage I think back when I was making a new handle for my Pax cross cut saw.I simple took the handle, not at all unlike this one, and unscrewed the Pax handle, removed it, lined up the two and with my awl, marked the screw holes...easy right?
Oh Pax...what have you done?
 So just to recap and get things clear in my own mind, I'm standing there with my newly made walnut handle, I take hold of my screwdriver and gently start to back out the brass screws. At this point I notice the Medallion on the side of the Pax handle is sitting proud...no big deal I thought, must be something underneath...I'll clean it up when I remove the handle. So first screw, second screw; down through to five all of the screws come out. I squeeze the blade of the saw into my shoulder vise and make my first attempt to remove the handle. No luck..? I get a little more aggressive and try the whole wiggle-waggle-back-and forth approach...still nothing, not even a squeak. I place a wood block on the heel of the blade and gently at first try tapping to loosen the handle. O.k. at this point I'm starting to realise something is not right. Did they glue it on? No, couldn't be. That would be just plain ignorant. Some more prying, some hitting and then on to some down home whacking! Come on, this should come off...what if I just wanted to do a quick tune up, cleaning or sharpening? Saw handles are meant to be relatively easy to remove, no?
Then it happens, you know the blinding white light, ears start ringing, sweaty palms...I grab the biggest, meanest, ugliest chisel my tool box had to offer and split this thing open like a fresh brook trout in August. I didn't like it in the first place, but admittedly didn't want to destroy it either. So there I am, cracking and splintering the shiny new handle off of my nice new Pax rip saw...
(that's Pax right? I did mention it was a Pax right?)
 So like Indiana Jones discovering artifacts under the sands I see the problem. It seems this saw, during manufacturing must have assembled the wooden handle onto the blade and then drilled through the whole lot with a dull bit. The metal burned and charred through creating a kind of sleeve that mated into the opposite side of the wood.!@$%^&*(!!!"":{
If you look closely at the pics you can see what I mean...bad, shotty workman ship....that's just the way it is. Now I have to get out some files and flatten out the dimples of burnt metal left behind to irritate me to no end. (At least this was how I felt at the time.)
All calm and clean now, me and the saw that is, ready to trace the screw holes onto my new handle, drill them out and install the screws. No worries, at least the metal is un-damaged and seems to be well sharpened and straight. I breeze through these steps and give the handle a quick coat of oil. I didn't spend too much time on the sanding this time due to the fact that I have work to do! Boards to rip and kids to feed...so perhaps a little rough I'll get to it sometime in the future when I don't have four orders to finish.
 So here I go, putting things together, first screw, second screw...then I get to the medallion; I had forgotten about the way it had been sitting on the original handle. hmmmm.....crooked as a cats...again, the light starts to come back....I'm having an incredible hulk moment and want to throw the whole thing into a dumpster somewhere. How could this happen? The shiny little medallion, like a signature, carefully placed into the finished saw to say
 " made with pride by..." I just don't get it at all. What happened in the two years between saws? My cross cut I purchased from Lee Valley Tools seemed like a nicely made hand tool, other than the handle simply didn't suit my hand...two years later, this poorly made piece of...I digress. I put the handle on and went to work.
It cuts pretty good and my new handle is comfortable. I left the crooked medallion sitting proud of the side to remind me to call Mike Wenzloff again...You really do get what you pay for.

PS.
Hey Schwarz, I guess you're having an 'I told you so' moment right now...Cheers!
Wednesday, August 13, 2008
Pushing Ink...
New Woodworking Book
 I've been writing my Blog here since late February and can say I truly love to write almost as much as I enjoy wood working. Great.
Well it seems my key-board tap-tap-tapping is finally paying off...
I've just signed a contract with Popular Woodworking Books to write a full length book on building furniture using hand tools!
It will feature six new designs I'm working on, from a small side table to a full sideboard. All will feature different design elements complimenting hand cut joinery for hand tool users. Frame and Panel, Mortise and Tenon as well as dovetailing and other hand tool skills will be addressed.
My manuscript will be complete in the early new year with a release date just in time for the following Christmas.
If you enjoy my blogs here, it'll be this times a thousand...Stay tuned for more...
Cheers!
 I've been writing my Blog here since late February and can say I truly love to write almost as much as I enjoy wood working. Great.
Well it seems my key-board tap-tap-tapping is finally paying off...
I've just signed a contract with Popular Woodworking Books to write a full length book on building furniture using hand tools!
It will feature six new designs I'm working on, from a small side table to a full sideboard. All will feature different design elements complimenting hand cut joinery for hand tool users. Frame and Panel, Mortise and Tenon as well as dovetailing and other hand tool skills will be addressed.
My manuscript will be complete in the early new year with a release date just in time for the following Christmas.
If you enjoy my blogs here, it'll be this times a thousand...Stay tuned for more...
Cheers!
Friday, July 25, 2008
When the city seeps in...
On Design
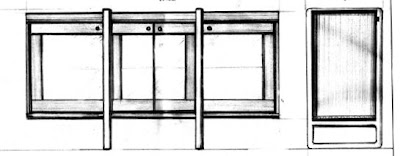
Three weeks to the day; the time it took for the city to seep in. I recently met a great couple and they asked me to design and build a piece of furniture for their home here in Toronto. The only two guidelines they had for me were to use a darker toned wood and attempt to incorporate some brushed aluminum into the piece. They already have a piece of furniture with an aluminum, decorative inlay and brushed aluminum door pulls. I immediately thought about the aluminum aspect of the piece. As soon as I blended mediums I knew it would have to be more than a simple accent.
Clean straight lines, aluminum and glass, what else says Urban living like this?
I've always been a fan of the more minimalistic approach to design; the modern movements and European influences. The over-all dimensions were a given due to the space requirements where the piece will be living. A kind of sideboard/cabinet with three sliding doors was my first instinct; but once the pencil went to paper things changed. Things always change from those first initial thoughts to design and then on to construction. Pieces evolve in a natural way, an ordinary process coming round full circle. Ideas seem to blend through the realities of joinery. One thing I want to maintain in the piece is a hand crafted look while still reflecting the machining of this metropolitan landscape. The aluminum aspect was decided on. Two 1 1/4" thick pieces of solid aluminum plating, cut and rounded by means of water jet. These two monoliths will make up the stand/ or legs of the unit; while the wooden carcass will fit perfectly inside the two larger cut-outs in the top portion of the plates.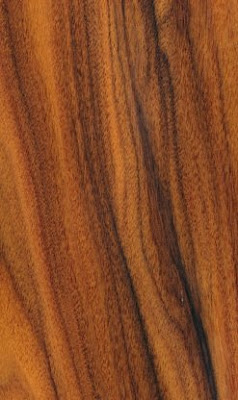 The wood at this point is still un-decided although I keep thinking PAU FERRO (Santos Rosewood) a dark bodied hardwood that will compliment the hand cut dovetailed box which will make up the bulk of the piece. The cabinet will be divided with two solid panels, isolating three separate spaces within. The doors are another design/construction reality altogether. I know I wanted to have sliding doors but now feel they'll eat up too much interior real estate. I decided on hinged doors incorporating glass panels. The first obvious choice for the door joinery would be a kind of frame and panel. This of course would be the obvious choice; and who could ever be satisfied with that? What I've come up with is a three sided, 'open~frame' and panel; the inside edge of the frame being only glass while the outside of the door solid wood. Full mortise and tenon joinery on the corners, with a kind of suspended glass panel within. A design challenge indeed, but one that will pay off in the final showcase. The interior will also feature glass shelves, securely sitting on Bronze ,threaded support sleeves. A real nice touch to allow the shelves to be adjustable to suit the contents later on.
Again, the initial impression would be three doors to match the three spaces, but now I'm thinking on off-setting the aluminum legs and making one larger middle space, incorporating two doors for it and then carry on with two slightly narrower side areas flanking this first mid-section. Designs can change, re-arrange and why not let them? Sketches and diagrams will only show so much to the hand caressing softened edges of exotic hardwoods later on. At this stage of the game, anything is possible, never limit yourself before you even leave the starting gates. Design for the impossible, dream the unimaginable and then finally settle on the realistic. Stay tuned...

Three weeks to the day; the time it took for the city to seep in. I recently met a great couple and they asked me to design and build a piece of furniture for their home here in Toronto. The only two guidelines they had for me were to use a darker toned wood and attempt to incorporate some brushed aluminum into the piece. They already have a piece of furniture with an aluminum, decorative inlay and brushed aluminum door pulls. I immediately thought about the aluminum aspect of the piece. As soon as I blended mediums I knew it would have to be more than a simple accent.
Clean straight lines, aluminum and glass, what else says Urban living like this?
I've always been a fan of the more minimalistic approach to design; the modern movements and European influences. The over-all dimensions were a given due to the space requirements where the piece will be living. A kind of sideboard/cabinet with three sliding doors was my first instinct; but once the pencil went to paper things changed. Things always change from those first initial thoughts to design and then on to construction. Pieces evolve in a natural way, an ordinary process coming round full circle. Ideas seem to blend through the realities of joinery. One thing I want to maintain in the piece is a hand crafted look while still reflecting the machining of this metropolitan landscape. The aluminum aspect was decided on. Two 1 1/4" thick pieces of solid aluminum plating, cut and rounded by means of water jet. These two monoliths will make up the stand/ or legs of the unit; while the wooden carcass will fit perfectly inside the two larger cut-outs in the top portion of the plates.
 The wood at this point is still un-decided although I keep thinking PAU FERRO (Santos Rosewood) a dark bodied hardwood that will compliment the hand cut dovetailed box which will make up the bulk of the piece. The cabinet will be divided with two solid panels, isolating three separate spaces within. The doors are another design/construction reality altogether. I know I wanted to have sliding doors but now feel they'll eat up too much interior real estate. I decided on hinged doors incorporating glass panels. The first obvious choice for the door joinery would be a kind of frame and panel. This of course would be the obvious choice; and who could ever be satisfied with that? What I've come up with is a three sided, 'open~frame' and panel; the inside edge of the frame being only glass while the outside of the door solid wood. Full mortise and tenon joinery on the corners, with a kind of suspended glass panel within. A design challenge indeed, but one that will pay off in the final showcase. The interior will also feature glass shelves, securely sitting on Bronze ,threaded support sleeves. A real nice touch to allow the shelves to be adjustable to suit the contents later on.
Again, the initial impression would be three doors to match the three spaces, but now I'm thinking on off-setting the aluminum legs and making one larger middle space, incorporating two doors for it and then carry on with two slightly narrower side areas flanking this first mid-section. Designs can change, re-arrange and why not let them? Sketches and diagrams will only show so much to the hand caressing softened edges of exotic hardwoods later on. At this stage of the game, anything is possible, never limit yourself before you even leave the starting gates. Design for the impossible, dream the unimaginable and then finally settle on the realistic. Stay tuned...
Subscribe to:
Posts (Atom)