Monday, October 5, 2009

SKETCH-UP

'gesundheit'


This past week a fellow East Coaster has been putting together some Sketch-Up models for the book projects. They'll all be available at my new website when the book is launched in November but I thought I'd show you some shots of the first project model here. It's the Cabinetsmakers Toolchest.
These are only 'stills' from the program but when you actually open the files in Sketch-up, you'll be able to zoom into the pieces, rotate them and flip them over, change your perspective on each 'scene' as well as 'orbiting' all around them to get a closer look. A really cool educational tool, they also have all of the dimensions and measurements for you.


If you don't know Sketch-up it's a free application from Google. Click the link to download! You'll be able to look inside the pieces, see the joinery up close and really get personal with the designs. It should also answer any joinery questions when the time comes for you to build these pieces in your own wood shops.
A great tool, it seems that every time he sends me a new model I can't help to think: "Man, I wish I had this while I was building them!"
I'm really looking forward to November...

Cheers!

(and thanks again Daniel)

Sunday, October 4, 2009

Tools of the Trades

Some New-Old Tools

It's Sunday afternoon and I spent the morning out in Pickering, Ontario at the Tools of the Trades Show. It's a really nice gathering of vintage and antique tool dealers peddling their wares to wood geeks like me! I would have posted some info on the event sooner but I only found out about it myself this past week. Oh well, for those that missed it you can catch the Spring session in April.
I went there this morning with nothing in mind really, I don't actually have a short list of tools I currently 'need' or even 'want'(imagine that). Once there though I found many, many tools I would have loved to acquire but my wife would have shot me if I came home with a truck load of new-old tools!
Anyhow, I did make two small purchases- the first is a small little oil can; I wanted one of these for awhile now and this one fit the bill perfectly. I'll use it to keep my Jojoba oil in. Jojoba oil is a natural, non-toxic oil product I use on my tools to keep rust at bay. It's similar to the camellia oil you may find for sale at places like Lie Nielsen Toolworks. The main difference is it's a little heavier but easily found off-the-shelf at health food stores while camellia oil is a little more rare(at least it seems to be in Toronto). The little oil can is copper or brass I believe and will live nicely above my work bench.

The second treasure I stumbled over is a beautiful example of a 1930's Stanley No.22 Transitional Smoother. If you're familiar with transitional planes you may have read reviews about the problems they seem to have with the rear totes moving and becoming loose while in use. One big plus about the No.22 is it doesn't have a rear tote, so......no problem! For anyone that isn't familiar with transitional planes they were wooden bodied planes that had a cast iron frame screwed into the body which was usually made from Beech. This perticular model has a kind of squat, mushroom shaped knob that's a little beafier than the taller, slimmer styles found on Stanley's metal planes. I like this 'robust' little front knob and find it fits my hand quite nicely.
Stanley claimed that "Every Carpenter needs two or more wood planes in his kit, for rough outside work" and the transitional plane was the answer for it. For a wooden bodied smoother, I really like the feel of this model and the fact that it doesn't have the rear tote adds to the comfort while in use. This model was also the first with a lateral adjuster. If you'd like some more information about transitional planes or any other Stanley hand planes for that matter, check out Patrick Leach's web site. It's an incredible resource of information.

This one is in beautiful shape with the original chip breaker and iron, a near-perfect condition lever cap and very-very few marks on the sole. Having the original chip breaker and iron with the added bonus of the Sweetheart logo still clearly visible was a nice touch indeed but that said, I'll rip them out of it as soon as I can and replace them with new ones from Ron Hock! What can I say I'm a worker, not a collector!

So these were my finds, small treasures on a nice Sunday morning surrounded by vintage tools and friendly people. If you were there you know what I'm talking about, if you missed it then maybe you can make the next one in April.
Cheers!

Saturday, October 3, 2009

Made by Hand

Coming Soon

As the book release draws closer, my good friend Douglas was kind enough to put this short trailer together. It's purpose is to promote the book and my new website- www.theunpluggedwoodshop.com which will go live in November.
Thought I'd share it here with you first.

Cheers!

Thursday, October 1, 2009

Making Mouldings and Shaping Wood

Warning: This is a ridiculously long post!

The first two days of the week was dedicated to the mouldings and I'm happy to say they're complete...finally! Funny now thinking back to when I ordered my moulding planes from Philly Planes in England, I had some comments from readers wondering how they'd perform in the oak...well if I didn't say it enough then I'll say it again - they're great! Lots of miles and lots of shavings, I'm very happy with these planes and the resulting mouldings I've made with them. There's a charm when you see hand cut mouldings versus a moulding that was manufactured with a Router bit. No comparison really, the small 'discrepancies' and slight 'imperfections' are what make them so unique and to my eye, rather beautiful. The gentle curves are obviously made by hand (no pun intended) and add a kind of crafted appeal to the overall aesthetic of the door.
I'd certainly recommend anyone thinking about a project with lots of mouldings to consider Philly Planes and to leave the router unplugged. Making them is not hard work but does take some time...I really enjoyed the process and will no doubt incorporate some moulding details into a furniture piece somewhere down the road.


So the mouldings were done on Monday evening and instead of turning my attention to sawing out the scroll detail under the window sill (which you may remember I intended to do next) I decided to keep going on the 'moulding' details while I had the bench set up with the sticking board and moulding planes and finish off all of these trim elements for the door. The corner pieces, a kind of architectural element, were at first a bit of a puzzle... How would I shape them? What would be my first step? After some consideration I decided to form the upper corner pieces as one long piece and then saw them down to size. You'll see what I'm talking about as I go through the process...The first step was to go back to my notes and make myself a template.

For my own use I've been calling these elements 'dentils'. I don't think that's accurate but what ever the proper terminology is they were next. Not surprising, I have a few nice off cuts of white oak around the shop and I traced my little card board cut out onto the edges of the stock - both ends of it. My kids were wondering what I was doing with the cereal box and scissors down in my shop....a little art time in the basement perhaps? (the cardboard from the cereal box was cut up to become the template if you're wondering!)I should also mention how I originally went about getting these templates...I should have showed you this way back when I suppose? Anyhow, I used a Stainless-Steel Tracing Profile Gauge I purchased from Lee Valley. This is the tool you need for finding profiles. Here's a shot I dug up from the process with the tool in use-I'm (secretly) getting the profile of the side mouldings for the window frame here at my clients neighbours door...


So back at the bench with my template ready to go I traced the profile and establish a series of rabbets and dados to remove the bulk of the waste. The same process of making the smaller mouldings just on a larger scale this time. Beginning with my marking gauge I carefully scribe deep, crisp lines to register the cutting iron of my plough plane.


In hind sight I should have re-sawn the stock to it's finished thickness before I cut the profiles but I went ahead and started the process. It all worked out fine but for anyone out there doing this type of work, re-saw to final thickness before you cut out the profiles. There's a lot less chance of damaging the piece.


I set the plough plane and work down the grooves into the oak. I wasn't too far along before I ran into another small, unforeseen problem. This profile is longer than the arms reach on my small plough plane so to cut these dadoes through the 'center portion' of the blank I would need to come up with an alternate method. I thought about simply sawing down on my scribe lines and removing the waste with my router plane but I remembered seeing an attachment Lee Valley offers for their skew rabbet plane. It's a pair of posts to make an arm extension-I wondered if it would fit the threads of the plough plane? I grabbed the rabbet plane and un-screwed the arms and tried them in the plough plane...they're the same. Good. A quick trip down to Lee Valley and $11.00 later I purchased these extension arms that fit and work fine in both plane models.


Something to consider if you already own either of these planes; a nice way to turn the 'small' plough plane into a large.? Speaking of the name 'small' plough plane I wonder if they may be offering a 'large' in the future?


With the new extension arms attached I finish off the grooves...


Then it's back to the moulding planes to start shaping the hollows and rounds. A series of passes from my number 4 up through to my number 12 will fair this main curve into the profile.


Now that the main shape is established I can go ahead and re-saw the stock.


The blank I'm using is 2" thick by 6" wide and in the neighbourhood of 8" long; my Bad Axe back saw burns down through the hardwood with ease. A quick clean-up and I'll cross cut the piece into the two corner 'dentils'.


At this stage they still need some fine sanding and the curves still need a little more fairing but for tonight they're done. These two pieces will live at the top of the window mouldings creating a nice focal point that'll draw the eye to the top of the door.


It was a lot of fun making these two pieces, they're something I probably never would have considered if this was a door I designed myself but I'm happy with the look of them and I'm anxious to move on to the other small architectural elements that fall at the bottom of these same side mouldings. Let's take a look at the steps I took in making them:

Back in the note book I carefully transfer my lines over to the wood stock and mark out the main dimensions of the profile. I then made another template and trace the shape to the blank. These profiles aren't the same kind of shape as the previous so it's not going to be a simple matter of removing the waste with the plough plane. If this was a shop full of power tools I'd simply walk over to the band saw and cut out the profile? (probably cut off the lower portion of my arm in the process!) All joking aside I decided to shape these two small detail pieces with a technique I used when building boats back in Cape Breton. When shaping a stem for a small sail boat or a dinghy I'd create a series of cuts down through the stock, establishing the side profile and then carve away the fat; same technique used here but only a much smaller scale. With that in mind I take the blank and on my bench hook begin the series of cross cuts...


Funny with all of the beautiful back saws hanging around my work shop I reach for my Japanese pull saw; a Dozuki. For small work like this, when I want to keep things very precise while maintaining the thinest kerf possible it's the Dozuki that shines. Notice where the stock is sitting in relation to the hook? A pull saw remember...that may shed some light as to why the fence is located where it is...(the plans for this and four more work shop appliances are in my book.)


The cross cutting is complete I'll move over to the face vise to rip out the waste.


I'm careful to follow down the profile removing each small section as I go...this is fun!


Now that I have the main profile roughed out I use a wide paring chisel to establish the main surface area of these small components; my scribe lines are still there, deeply set into the sides of the oak so I have a nice solid reference to work down to.


The thin little groove at the top of these pieces would be a real challenge to clean out but thanks to my detail chisels I'm able to accurately get in there and pare away the waste. This is a 1/16" wide, tapered chisel executed in a mortise-chisel shape to give it the required stiffness for such a narrow cutting tool. Designed by Yeung Chan, a California cabinetmaker and manufactured by Canadian knife maker Paul Beebe I can't say enough about these small chisels. I've mentioned them before in posts but always reinforce the fact that they're probably the most used tools in my work shop!
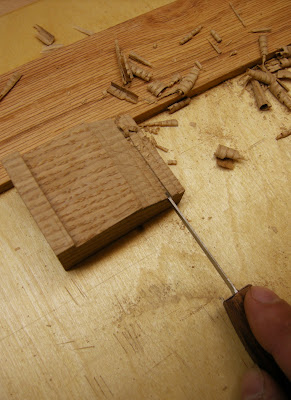


The sloped area is first shaped with a 6" 'Kutzall' file; with jagged, carbide teeth they eat through wood in a hurry! Sometimes too fast so I'm careful to watch my progress.


From there the curve is refined and smoothed with a finer cabinet file...


and finally a bit of sand paper...I use the Norton 3X brand which seems to work faster, is less prone to 'load' and doesn't rip and shred quite as fast as the other brands I've tried. To be honest, I absolutely hate sanding so the quickest, cleanest product I can find I use.


Now that the curved area is complete I'll take a full sheet of that same paper and on a 1/4" piece of safety glass work the sides of the pieces. Normally I would reach for a hand plane but because of the size of these elements and the small bead at the front, the last thing I'd want is to tear out some wood or mess up the profile. A few minutes with the sand paper on glass and I'm ready for the final steps in making these pieces.


The door design dictates two small squares set in the lower front edge and to make them I'll stay with the Dozuki. A couple of small cuts after careful lay-out will establish the waste area needing to be removed. I pay close attention not to saw down too far going beyond my finished surface depth.


A bit of chisel work to remove the waste...


and then some clean up. A few small chamfers again with my detail chisels and I can call these pieces done.


Here they are with the other door elements...


And finally a shot of the two lower components showing where they'll live in relation to the side window mouldings. This is actually the interior of the door and all of these pieces will be on the outside but you'll get the idea!


With that I'll stop for tonight-all that's left is the scroll under the window sill and some final clean-up. With any luck I'll be slappin' on some finish by Sunday and beginning the glue up early next week.
If you've read this far I'll say thanks...this post was starting to turn into a short novel! Sorry about that...just wanted to show the entire process of making these elements. I enjoyed making them and hope you enjoyed watching the process as well.
Cheers!

Sunday, September 27, 2009

Updates and Appreciation

Fighting with Flu Bugs


I want to start off with a big THANK YOU to everybody that has pre-ordered a copy of Made by Hand:Furniture Projects from the Unplugged Woodshop; the response and positive feedback has really made my week and I wanted to say again how much I appreciate the support. :)
That said, I've been feeling like a bag of s**t for the past five days! Been battling a flu bug all week so the door production has been pretty slow. I did manage to get a good bit of the window mouldings completed yesterday and today. I must be getting the upper hand on the little buggars!

It's funny, all through the building process I'd been sort of thinking that the 'hard' work was over with but as it turns out (and isn't this always the way?) the window treatments have been more work than I planned. It's not that they're exceptionally difficult but there's alot of them and they're thin mouldings so working on them is a bit of a juggling act. I built myself a 'sticking board' when I started the panel mouldings but it's just a little too wide and too short for these ones. I should have made another for the smaller mouldings but instead I've been placing side batons and clamps to hold things in place...not ideal but it is working.Lots of jigging and fussing and cussing about! If I were feeling better this past week I would have made a new one but everything gets amplified when you're trying to fight off a cold.
So I had hoped by this point tonight I'd be showing some pictures of all the door elements completed but it wasn't in the cards. I do only have a few more pieces to finish so hopefully by weeks end. Then it'll be on to the finishing and glue up.
Notice the order? Yup finish first...well most of it anyway. I'm going to pre finish the mouldings, the panels and all of the other 'rick-rack' before assembly. Less chance of runs and the like. Also, as far as the panels go I'll definitely finish them so in the event they do somehow shrink and expand the 1/2" I've allotted then you wouldn't see any unfinished wood showing on the edges.
With that, I'm going to go make a cup of tea and sit down to listen to the last episode of Wood Talk online...Marc Spagnuolo (the Wood Whisperer) just informed me that they gave the blog a plug! Check it out here: http://thewoodwhisperer.com/wood-talk-online-59/


Tomorrow I'm going to be breaking out the 'ol bow-saw...you can see the shape of the window sill decorative treatment in the shot above; should be fun!
Stay tuned.

Monday, September 21, 2009

A first look Inside Made by Hand:

Furniture Projects from the Unplugged Woodshop

The following images are excerpts from my new book. The introduction as well as a sneak peak at three of the six 'furniture project chapters'.
The book also features five more plans for workbench appliances; a shooting board, bench hook, miter hook, winding sticks and Krenov inspired saw horses. Take a look inside and see what you think. You'll also get a free DVD that will walk you through all of the hand tools I used in these projects; from Lie Nielsen to Lee Valley we'll take a close look at the more popular manufacturers on the market today and I'll discuss the pros and cons of each. This will really help out the beginner who can sometimes feel overwhelmed when starting the journey into wood working.

I'm more than willing to help you out along the way when you start making these projects yourself through e-mail as well as my blog.

Thanks for reading and happy shavings!

Tom


Sunday, September 20, 2009

Shop clean-up and Mouldings

A little Fine Tuning...

I was working on the heritage door the end of last week, the inside mouldings to be more specific. I was planning on getting into the final front window surrounds over the weekend but things didn't pan out that way due to the fact that my client is actually busier than I am! I should back track and mention that my writing book, the graph paper scribbler I use for all of my wood notes, including all of my templates for the moulding profiles I had made earlier this spring, was left behind in Cape Breton this summer. I knew this for the past few weeks and was trying to set up a time with my client to go over and visit the neighbours house again. Get some new profiles off of the window treatments and finally get this thing done!
Anyhow, because of the world we live in and everybody seems to never have enough time, (myself included) I wasn't able to get the profiles so I spent yesterday re-organising my shop space. It was really getting cramped with the way things were, the door only accessible from one side and one end, my offcuts from the project starting to way in on my fragile sanity; I needed to move my bench back over against the wall and re-jig the doors work station.
I have been using my shop 'bents' (a Krenov inspired work horse) with some off cuts of walnut as runners to span the bents and a thin sheet of luan as my main template for the door. This worked out fine while I made the frame for the door but now that I've come to fine tuning my miters and mouldings I really needed to beef things up.
Before I was able to really fine tune all of my miters I had to be sure the door was lying as flat as I could make it, and through it all staying perfectly square. A kind of challenge in this small space where every move means moving all of the pieces around again...and again, and again. (have I mentioned I need a bigger shop lately?) So yesterday morning I purchased a sheet of 3/4" plywood and got a few batons of Ipe from a friend, ipe is a South American hardwood that is very heavy, hard and dense. These 2" x 2" x 6' batons will straddle my bents and the plywood will finish the work area. The door with it's 1/4" luan template slid easily from my work bench over to this make shift one. The shop bents I made are from hickory, another incredibly hard and dense wood. This turned out to be the perfect species for my shop bents- they really need to be structurally sound around my shop. If we consider that between the oak, the ipe and the plywood alone they're probably supporting close to 200 lbs!
No worries, they're working great!
I should mention that the plans and building instructions for these are included in my new book due out in November.
So that was my day yesterday, sweeping and cleaning and pushing and lugging...good for the soul to get things back in a nice state. Cleanliness is what again?
So this morning I spent a few hours going around each one of the panels to insure all of my miters are clean and crisp.
The first thing I needed to do was build a little bench top appliance to securely hold the mouldings as I worked them. Getting them to this level was straight forward between some bench dogs, but now that they're all mitered...holding them in place while you try to take the lightest shaving off can be a real challenge.


I had a 2" x 6" x 4' slab of heavy maple and cut out a few miters and batons with some off cuts. These in turn were glued to the surface of the plank and will act as small fences to hold the work pieces in place while I fine tune things. I used some cyanoacrylate glue that sets up in about 10 seconds. This is all that I needed and off I went to fit and tune these door back mouldings. They honestly didn't require a ton of work but a few places I did get out the moulding planes and onto some sandpaper.


A couple of hours and they're done. My plan right now is to go over to the clients tomorrow and get those other few profiles...


Stay tuned.