Warning: This is a ridiculously long post!
The first two days of the week was dedicated to the mouldings and I'm happy to say they're complete...finally! Funny now thinking back to when I ordered my moulding planes from
Philly Planes in England, I had some comments from readers wondering how they'd perform in the oak...well if I didn't say it enough then I'll say it again - they're great! Lots of miles and lots of shavings, I'm very happy with these planes and the resulting mouldings I've made with them. There's a charm when you see hand cut mouldings versus a moulding that was manufactured with a Router bit. No comparison really, the small
'discrepancies' and slight
'imperfections' are what make them so unique and to my eye, rather beautiful. The gentle curves are obviously
made by hand (no pun intended) and add a kind of
crafted appeal to the overall aesthetic of the door.
I'd certainly recommend anyone thinking about a project with lots of mouldings to consider Philly Planes and to leave the router unplugged. Making them is not hard work but does take some time...I really enjoyed the process and will no doubt incorporate some moulding details into a furniture piece somewhere down the road.

So the mouldings were done on Monday evening and instead of turning my attention to sawing out the scroll detail under the window sill (which you may remember I intended to do next) I decided to keep going on the 'moulding' details while I had the bench set up with the sticking board and moulding planes and finish off all of these trim elements for the door. The corner pieces, a kind of architectural element, were at first a bit of a puzzle... How would I shape them? What would be my first step? After some consideration I decided to form the upper corner pieces as one long piece and then saw them down to size. You'll see what I'm talking about as I go through the process...The first step was to go back to my notes and make myself a template.

For my own use I've been calling these elements 'dentils'. I don't think that's accurate but what ever the proper terminology is they were next. Not surprising, I have a few nice off cuts of white oak around the shop and I traced my little card board cut out onto the edges of the stock -
both ends of it. My kids were wondering what I was doing with the cereal box and scissors down in my shop....a little art time in the basement perhaps? (the cardboard from the cereal box was cut up to become the template if you're wondering!)I should also mention how I originally went about getting these templates...I should have showed you this way back when I suppose? Anyhow, I used a
Stainless-Steel Tracing Profile Gauge I purchased from Lee Valley. This is the tool you need for finding profiles. Here's a shot I dug up from the process with the tool in use-I'm (secretly) getting the profile of the side mouldings for the window frame here at my clients neighbours door...

So back at the bench with my template ready to go I traced the profile and establish a series of rabbets and dados to remove the bulk of the waste. The same process of making the smaller mouldings just on a larger scale this time. Beginning with my marking gauge I carefully scribe deep, crisp lines to register the cutting iron of my plough plane.

In hind sight I should have re-sawn the stock to it's finished thickness
before I cut the profiles but I went ahead and started the process. It all worked out fine but for anyone out there doing this type of work,
re-saw to final thickness before you cut out the profiles. There's a lot less chance of damaging the piece.

I set the plough plane and work down the grooves into the oak. I wasn't too far along before I ran into another small, unforeseen problem. This profile is longer than the arms reach on my small plough plane so to cut these dadoes through the 'center portion' of the blank I would need to come up with an alternate method. I thought about simply sawing down on my scribe lines and removing the waste with my router plane but I remembered seeing an attachment Lee Valley offers for their skew rabbet plane. It's a pair of posts to make an arm extension-I wondered if it would fit the threads of the plough plane? I grabbed the rabbet plane and un-screwed the arms and tried them in the plough plane...they're the same. Good. A quick trip down to Lee Valley and $11.00 later I purchased these extension arms that fit and work fine in both plane models.

Something to consider if you already own either of these planes; a nice way to turn the 'small' plough plane into a large.? Speaking of the name 'small' plough plane I wonder if they may be offering a 'large' in the future?

With the new extension arms attached I finish off the grooves...

Then it's back to the moulding planes to start shaping the hollows and rounds. A series of passes from my number 4 up through to my number 12 will fair this main curve into the profile.

Now that the main shape is established I can go ahead and re-saw the stock.

The blank I'm using is 2" thick by 6" wide and in the neighbourhood of 8" long; my
Bad Axe back saw burns down through the hardwood with ease. A quick clean-up and I'll cross cut the piece into the two corner
'dentils'.

At this stage they still need some fine sanding and the curves still need a little more fairing but for tonight they're done. These two pieces will live at the top of the window mouldings creating a nice focal point that'll draw the eye to the top of the door.

It was a lot of fun making these two pieces, they're something I probably never would have considered if this was a door I designed myself but I'm happy with the look of them and I'm anxious to move on to the other small architectural elements that fall at the bottom of these same side mouldings. Let's take a look at the steps I took in making them:

Back in the note book I carefully transfer my lines over to the wood stock and mark out the main dimensions of the profile. I then made another template and trace the shape to the blank. These profiles aren't the same kind of shape as the previous so it's not going to be a simple matter of removing the waste with the plough plane. If this was a shop full of power tools I'd simply walk over to the band saw and cut out the profile?
(probably cut off the lower portion of my arm in the process!) All joking aside I decided to shape these two small detail pieces with a technique I used when building boats back in Cape Breton. When shaping a stem for a small sail boat or a dinghy I'd create a series of cuts down through the stock, establishing the side profile and then carve away the fat; same technique used here but only a much smaller scale. With that in mind I take the blank and on my bench hook begin the series of cross cuts...

Funny with all of the beautiful back saws hanging around my work shop I reach for my Japanese pull saw; a Dozuki. For small work like this, when I want to keep things very precise while maintaining the thinest kerf possible it's the Dozuki that shines. Notice where the stock is sitting in relation to the hook? A pull saw remember...that may shed some light as to why the fence is located where it is...(the plans for this and four more work shop appliances are in my book.)

The cross cutting is complete I'll move over to the face vise to rip out the waste.

I'm careful to follow down the profile removing each small section as I go...this is fun!

Now that I have the main profile roughed out I use a wide paring chisel to establish the main surface area of these small components; my scribe lines are still there, deeply set into the sides of the oak so I have a nice solid reference to work down to.

The thin little groove at the top of these pieces would be a real challenge to clean out but thanks to my
detail chisels I'm able to accurately get in there and pare away the waste. This is a 1/16" wide, tapered chisel executed in a mortise-chisel shape to give it the required stiffness for such a narrow cutting tool. Designed by Yeung Chan, a California cabinetmaker and manufactured by Canadian knife maker Paul Beebe I can't say enough about these small chisels. I've mentioned them before in posts but always reinforce the fact that they're probably the most used tools in my work shop!
The sloped area is first shaped with a 6"
'Kutzall' file; with jagged, carbide teeth they eat through wood in a hurry! Sometimes too fast so I'm careful to watch my progress.

From there the curve is refined and smoothed with a finer cabinet file...

and finally a bit of sand paper...I use the Norton 3X brand which seems to work faster, is less prone to 'load' and doesn't rip and shred quite as fast as the other brands I've tried. To be honest, I absolutely hate sanding so the quickest, cleanest product I can find I use.

Now that the curved area is complete I'll take a full sheet of that same paper and on a 1/4" piece of safety glass work the sides of the pieces. Normally I would reach for a hand plane but because of the size of these elements and the small bead at the front, the last thing I'd want is to tear out some wood or mess up the profile. A few minutes with the sand paper on glass and I'm ready for the final steps in making these pieces.

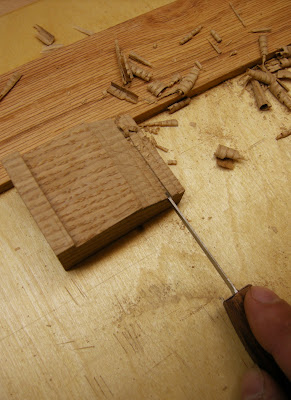
The door design dictates two small squares set in the lower front edge and to make them I'll stay with the Dozuki. A couple of small cuts after careful lay-out will establish the waste area needing to be removed. I pay close attention not to saw down too far going beyond my finished surface depth.

A bit of chisel work to remove the waste...

and then some clean up. A few small chamfers again with my detail chisels and I can call these pieces done.

Here they are with the other door elements...

And finally a shot of the two lower components showing where they'll live in relation to the side window mouldings. This is actually the interior of the door and all of these pieces will be on the outside but you'll get the idea!

With that I'll stop for tonight-all that's left is the scroll under the window sill and some final clean-up. With any luck I'll be slappin' on some finish by Sunday and beginning the glue up early next week.
If you've read this far I'll say thanks...this post was starting to turn into a short novel! Sorry about that...just wanted to show the entire process of making these elements. I enjoyed making them and hope you enjoyed watching the process as well.
Cheers!


